Quick Start
If you just want to get right in with a high level overview of how to use this system, then follow the steps below. Otherwise I would take the time to read some of the other pages of the documentation and definitely try out the examples that come with the system to see how it works and how those were setup.
- Drag the template
Dialogue Systeminto the hierarchy. - Under your NPC characters as the first child, drag the template
Dialogue Triggerinto the hierarchy and setup the trigger volume size / position. - Create a
Client Contextfolder which will become the database for the dialogue system. - Drag the script
Dialogue_Conversationinto the database folder and setup the properties. - Drag the script
Dialogue_Conversation_Entryas a child of theDialogue_Conversationscript. Repeat for branches and sub branches. - For player choices, drag the
Dialogue_Player_Choicescript as child of either existing choice scripts or entry scripts. - Drag the database folder onto the property of the
Dialogue Systemfolder.
Tip
For proper understanding of the hierarchy when creating dialogue branches and choices, I would suggest reading the documentation to understand it more, or checkout the examples that come with the system to see how they are setup.
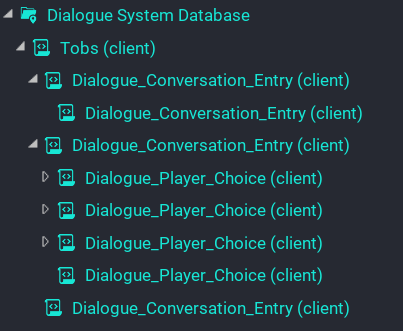
Below is an example structure of the NPC Tobs in the advanced example.
Note
The script Dialogue_Conversation is renamed in the example to the NPC name. This makes it much easier when you have a lot of conversations setup for different characters.